
What Makes a Great Golf Simulator Room (And What You Actually Need to Build One)
A well-designed golf simulator room gives you a full, unrestricted swing, accurate ball tracking, and a realistic playing experience — all without leaving home. Here’s a quick overview of what matters most:
| Factor | Minimum | Ideal |
|---|---|---|
| Ceiling Height | 9 ft | 10 ft or higher |
| Room Width | 10 ft | 12–16 ft |
| Room Depth | 12–15 ft | 15–20 ft |
| Screen Distance | 8 ft from mat | 10 ft from mat |
| Space Behind Golfer | 6 ft | 8 ft |
Cost range: From a few hundred dollars for a basic net-and-monitor setup to $20,000+ for a premium turnkey installation with enclosure, projector, and high-end launch monitor.
Florida summers are brutal. The heat index hits triple digits by 9am, your tee time is an hour away, and by the time you finish 18 holes you’ve lost more to exhaustion than swing mechanics. That’s exactly why more serious golfers here are building dedicated simulator rooms at home — climate-controlled, always available, and dialed in to tour-level precision.
Whether you’re starting from scratch in a spare room or converting a two-car garage, the decisions you make early — ceiling height, room depth, component selection — determine whether your setup feels like a pro studio or a frustrating compromise.
This guide covers everything you need to know: dimensions, layout, components, conversions, and the key differences between DIY kits and custom professional builds.
I’m Gary Wilder, founder of Sims & Greens, a 1-handicap golfer with 8 years of specialized golf simulator room installation experience and a background training over 90 franchises worldwide in high-performance golf surface construction. In the sections ahead, I’ll walk you through exactly how we approach these builds — from the first measurement to the final calibration.
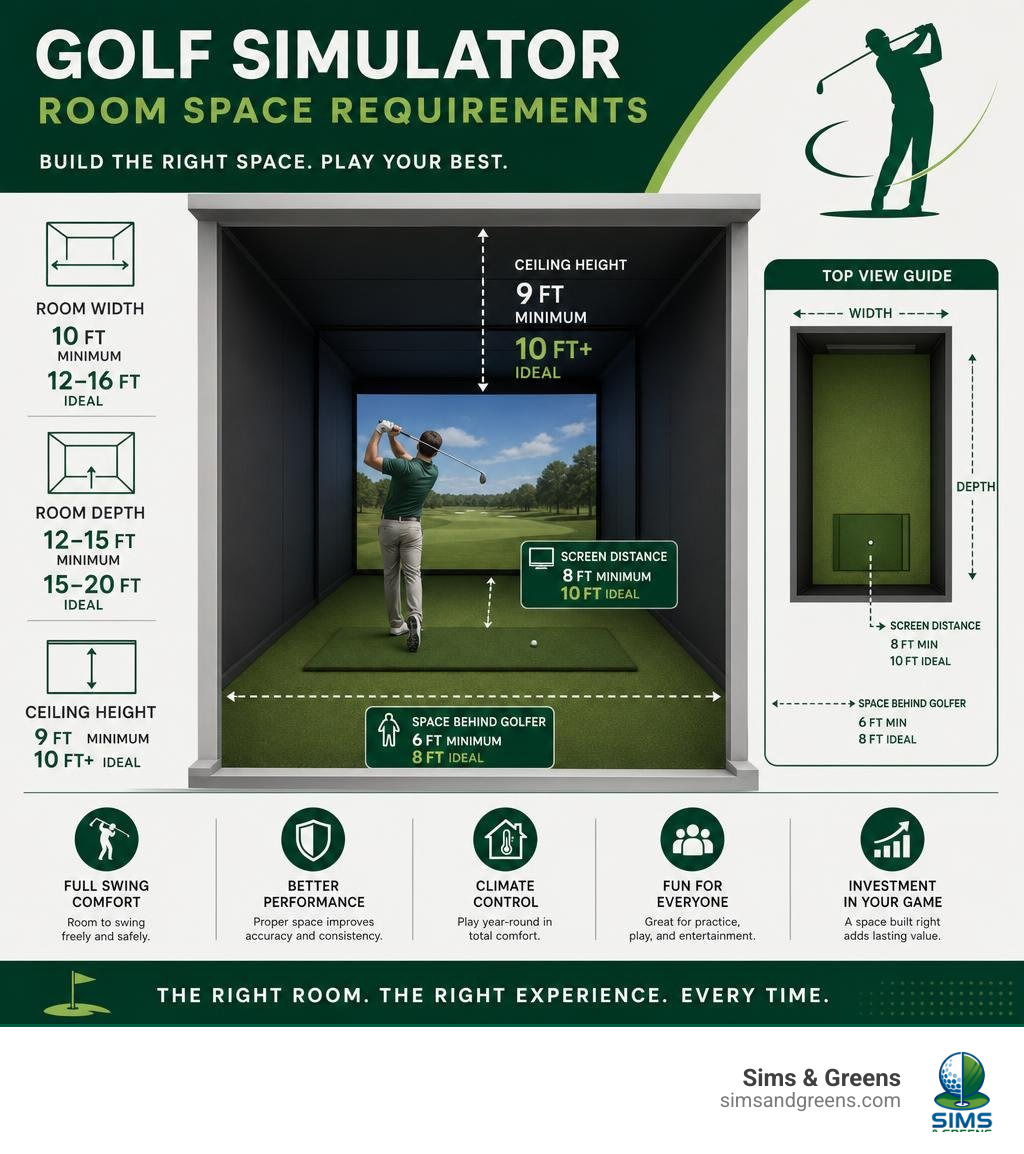
Essential Golf Simulator Room Dimensions and Space Requirements
When planning your golf simulator room, space is the ultimate currency. If you don’t have enough of it, your brain will naturally restrict your swing to protect your walls, your ceiling, and your kneecaps. This “indoor swing syndrome” ruins your mechanics and drains the fun out of the game.
To build a space that lets you unleash a full, aggressive driver swing, you must understand both the absolute minimums and the optimal dimensions. Let’s look at how these numbers break down:
| Dimension | Minimum Functional Size | Recommended Ideal Size | Why It Matters |
|---|---|---|---|
| Ceiling Height | 9 feet | 10 feet to 12 feet | Prevents club damage; allows full driver release for taller players. |
| Room Width | 10 feet | 12 feet to 16 feet | Keeps the ball centered on the screen; essential for dual-handed play. |
| Room Depth | 12 to 15 feet | 15 to 20 feet | Provides safe bounce-back distance and accurate tracking. |
Before you buy a single piece of turf or a launch monitor, you need to map out your space against these exact measurements. If you want to see how these dimensions translate to a high-end residential build, check out our guide on the Home Golf Simulator 2026 to see what modern luxury setups require.
The type of tracking technology you choose also dictates your room depth:
- Camera-Based (Photometric) Systems: Units like the Foresight GC3, GCQuad, or Uneekor EYE XO sit to the side of the ball or mount overhead. Because they capture data right at impact, they require less room depth—typically 12 to 15 feet is plenty.
- Radar-Based Tracking Systems: Units like the FlightScope Mevo+ or Garmin Approach R10 sit behind the golfer. They need to “see” the ball fly for at least 8 feet before it hits the screen, plus they require 6 to 8 feet of space behind the hitting mat to sit safely. This means you will need a minimum room depth of 16 to 20 feet to get accurate numbers.
Ceiling Height: The Most Critical Measurement
If there is one measurement that can completely stall a golf simulator room project, it is ceiling height. You can always stand slightly off-center to accommodate a narrow room, but you cannot change the physical limit of a low ceiling.
A 9-foot ceiling is the absolute bare minimum. At 9 feet, most players under 6 feet tall can swing short irons and hybrids comfortably. However, if you pull out a 45.5-inch driver and have a steep, upright swing plane, you are going to hit the ceiling.
For a truly comfortable, worry-free experience, we strongly recommend a ceiling height of 10 to 11 feet. Taller players (6’2″ and above) or golfers with exceptionally vertical swing releases will feel much more confident with 10.5 to 12 feet of clearance.
If you are thinking about building a dedicated outdoor structure to house your setup instead of using an spare bedroom, take a look at The Ultimate Guide to Golf Shed Dimensions and Layouts to learn how to frame and clear your rooflines properly.
Width and Depth for Safe, Unrestricted Swings
Room width is directly tied to safety and visual immersion. A 10-foot-wide room is functional, but it forces you to offset your hitting mat to one side so your backswing doesn’t strike the wall behind you. While this works, it means you will be aiming at an angle rather than dead-center at the screen, which can throw off your alignment.
An ideal width of 12 to 16 feet allows you to place the hitting mat directly in the center of the room. This centered alignment is crucial if you plan on hosting both right-handed and left-handed golfers. If you try to run a dual-handed setup in a room under 14 feet wide, you will constantly have to slide your hitting mat and recalibrate your launch monitor every time players switch sides.
For depth, we recommend keeping your hitting mat 8 to 10 feet away from the impact screen. This distance provides a realistic view of the ball flight while ensuring that high-velocity ball bounce-back doesn’t ricochet off the screen and hit you. You also need to leave 6 to 8 feet of clear space behind the golfer to accommodate the backswing and any spectator seating.
To see how these dimensions come together in a premium, ultra-polished setting, explore our Elite Home Golf Simulator options.
Designing the Ultimate Golf Simulator Room Layout
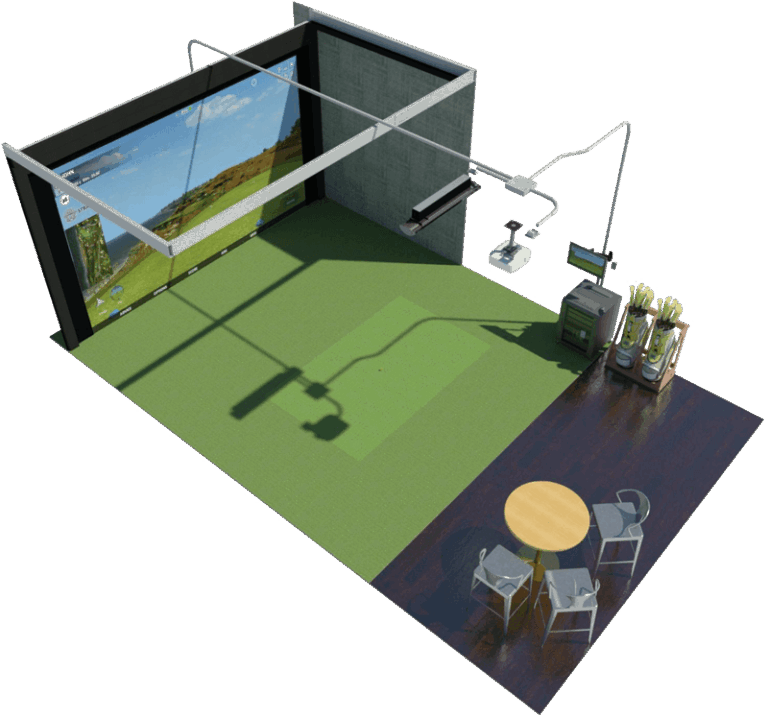
A great golf simulator room is more than just a collection of expensive electronics; it is an ecosystem where hardware, lighting, acoustics, and space planning work together. If your layout is off, you will deal with issues like washed-out screen images, deafening ball-strike noise, or cords cluttering your floor.
When we design a premium layout, we prioritize three main elements:
- The Hitting Zone: This is the heart of the room. The hitting mat must be perfectly level with the surrounding turf to ensure a proper stance.
- Projector Placement: The projector must be positioned to avoid casting the golfer’s shadow on the screen. This usually means mounting it directly overhead or slightly behind the hitting area using a short-throw lens.
- Acoustic Treatment: When a golf ball leaves a driver face at 150 MPH and smashes into an impact screen, it creates a massive acoustic shockwave. If your walls are bare drywall, your simulator room will sound like a firing range.
To keep your home peaceful and block out the loud “thwack” of impact, soundproofing is essential. Read our guide on Acoustic Dampening Sound Design to learn how we use specialized wall panels, heavy drapes, and padded ceiling baffles to absorb sound waves and keep the rest of your house quiet.
Best Practices for Your Golf Simulator Room Layout
To ensure your room is safe, clean, and highly functional, follow these layout best practices:
- Center the Hitting Mat: Whenever possible, center your mat relative to the screen. This creates a natural target line and makes aiming much more intuitive.
- Implement Clean Cable Management: Run HDMI, power, and ethernet cables through the walls or ceiling during the framing phase. If you are retrofitting a room, use heavy-duty rubber floor cord covers to eliminate tripping hazards.
- Control Ambient Light: Projectors hate light. Avoid placing your screen directly opposite windows. Use blackout curtains or motorized shades to eliminate glare and keep your projected image crisp and vibrant. For detailed projector mounting calculations, check out our Golf Projectors Guide.
Sourcing the Right Components for Your Golf Simulator Room
Building your dream room requires choosing components that work in harmony with your space’s physical dimensions. Here is what you need to consider:
- Launch Monitors: Your choice depends on your space and budget. Overhead camera systems (like the Uneekor EYE XO2 or Foresight Falcon) keep the floor completely clear and are perfect for permanent, high-end rooms. Portable units (like the SkyTrak+ or Bushnell Launch Pro) sit on the ground next to the ball and are great for multi-purpose rooms.
- Impact Screens: Look for a triple-layer, heavy-duty impact screen that can withstand thousands of high-speed shots while dampening sound. To find the right fit for your frame, refer to our Impact Screens Guide.
- Short-Throw Projectors: To get a massive, bright image from just a few feet away, you need a high-quality short-throw projector. Laser projectors are highly recommended over lamp-based models because they turn on instantly, run cooler, and maintain their brightness for up to 20,000 hours. For our top recommendations, see our list of the Best Golf Simulator Projectors.
Converting Garages, Basements, and Small Spaces
You don’t need a massive, custom-built addition to enjoy indoor golf. Some of the best installations we build in the Tampa Bay and Pinellas County areas are conversions of existing spaces like garages, basements, and bonus rooms.
Here is how to tackle the most common conversion spaces:
- Garage Conversions: Garages are fantastic because they usually offer great width and depth. However, in Florida, garages get incredibly hot and humid. To protect your sensitive launch monitors and high-end projector, you must install a dedicated mini-split AC system and fully insulate the garage door. Additionally, make sure to account for the slope of the garage floor (which is designed to drain water) by using a leveling subfloor.
- Basement Conversions: While basements are rare in coastal Florida, some inland homes have them. The primary challenge here is ceiling height. If you have a drop ceiling, you can often gain an extra 6 to 12 inches of clearance by removing the drop panels and painting the exposed joists black for an industrial, modern look.
- Bonus Rooms: These spaces often have vaulted or cathedral ceilings, which can make mounting a projector tricky. In these cases, we use custom drop-down ceiling mounts or frame-mounted projector beams to position the lens at the perfect height and angle.
If you are ready to explore how your specific space can be transformed, visit our main Golf Simulator page to see our full range of custom residential design services.
Overcoming Common Small-Space Installation Mistakes
When trying to squeeze a golf simulator room into a tight space, avoid these common pitfalls:
- Standing Too Close to the Screen: Squeezing your hitting mat closer than 8 feet to the screen to save space is highly dangerous. The ball will bounce back with incredible speed, risking injury or damage to your clubs.
- Ignoring Swing Path Clearance: Always do a slow-motion test swing with your longest driver before mounting any overhead equipment. Ensure your swing path clears light fixtures, ceiling fans, and side walls.
- Poor Lighting Choices: Avoid placing bright overhead lights directly between the projector lens and the screen, as this will completely wash out your image. Instead, use focused, directional LED spotlights over the hitting mat to illuminate the ball without spilling light onto the screen.
For a deeper look at avoiding these mistakes and planning your timeline, read our updated guide on the Home Golf Simulator 2026.
Custom Professional Builds vs. DIY Simulator Kits
If you are building a golf simulator room, you have two main paths: sourcing a DIY kit or hiring a professional custom builder.
While DIY kits have their place for basic setups, they often leave you with visible pipes, loose fabric wrinkles, and generic turf that doesn’t roll like a real green.
At Sims & Greens, we specialize in high-end, custom-engineered rooms. We provide detailed technical drawings and photorealistic 3D renderings of your space before we cut a single piece of timber. This ensures that every element—from the level of the putting turf to the tension of the impact screen—is mathematically dialed in. If you are located in the Clearwater area, you can learn more about our local design process by visiting Golf Simulator Clearwater.
Frequently Asked Questions About Golf Simulator Rooms
What is the absolute minimum ceiling height for a golf simulator room?
The absolute minimum ceiling height is 9 feet. At this height, you can comfortably swing short irons and mid-irons. However, most golfers will not be able to swing a driver or wood without hitting the ceiling or holding back their swing. For a natural, unrestricted swing with every club in your bag, we highly recommend a ceiling height of at least 10 feet.
If you are located in Pinellas County and want to discuss how to maximize your ceiling height in an older home, reach out to our team at Golf Simulator St. Petersburg for a local consultation.
Can a golf simulator room accommodate both left- and right-handed players?
Yes, but it requires careful planning. To accommodate both lefties and righties without constantly moving equipment, you need a room width of at least 14 to 16 feet. This extra width allows you to place the hitting mat dead-center.
You will also need to use an overhead launch monitor (like the Uneekor EYE XO or Foresight Falcon) or a ceiling-mounted system. Because these units track the ball from above, they cover a wide hitting zone that works perfectly for both sides of the ball. To learn more about choosing the right tracking technology for a multi-user space, check out our Golf Simulator technology overview.
How far should the hitting mat be from the impact screen?
We recommend placing the front edge of your hitting mat 8 to 10 feet away from the impact screen. This distance is the sweet spot: it is far enough to prevent high-velocity ball bounce-back from hitting the golfer, yet close enough to ensure that the projected image feels immersive and fills your entire field of view.
To learn more about screen tensioning, frame safety, and fabric materials that prevent bounce-back, read our comprehensive Impact Screens Guide.
Conclusion
Building a golf simulator room is one of the most exciting home improvement projects a golfer can undertake. It transforms a simple spare room, garage, or shed into a high-tech sanctuary where you can dial in your swing, entertain friends, and play iconic courses like Pebble Beach or the fictional “Georgia Golf Club” (GSPro’s stunning recreation of Augusta National) whenever you want.
However, getting the dimensions, acoustics, and technology right requires precision. A single miscalculation in ceiling height or projector throw distance can turn a dream project into an expensive headache.
At Sims & Greens, we take the guesswork out of the equation. We design and build luxury home golf simulators, climate-controlled outdoor gazebos, and custom putting greens across the Tampa Bay area — including South Tampa, Clearwater, St. Petersburg, Belleair, Madeira Beach, and Treasure Island.
As a premium residential golf construction firm engineered by a 1-handicap golfer and trusted by PGA pros, we build turnkey, tour-level facilities tailored to your exact space. Whether you want to experience the high-energy social vibe of commercial venues, practice your short game on a championship-grade surface like the greens at Belleair Country Club: Public Home, or replicate a premium indoor golf lounge feel right in your home, we have the expertise to make it happen.
If you are ready to stop fighting the Florida heat and start practicing in your own custom-built studio, visit our main Golf Simulator page to schedule your design consultation today. Let’s build a space that elevates your game.